Water propagation is the simplest way to grow new pothos plants, especially if you've never propagated anything before. You don't need soil, rooting hormone, or special equipment - just a cutting, a jar of water, and a windowsill. Because the roots develop in clear water, you can watch the entire process unfold, which helps you learn what healthy root growth looks like and when your cutting is ready to pot.
This method costs almost nothing. A single pothos vine can give you multiple cuttings, and most people already have a glass jar or cup at home. Unlike soil propagation, where you have to guess whether roots are forming underground, water lets you see exactly what's happening. If something goes wrong - like the stem rotting or no roots appearing - you'll notice it early and can adjust.
Pothos is also one of the most forgiving plants for beginners. The vines root quickly in water, tolerate a range of light conditions, and don't require precise timing or temperature control. If you've been hesitant to try propagation because you're worried about killing plants, pothos in water is a low-pressure way to build your confidence. You'll see visible progress within one to two weeks, which makes the learning curve much shorter than with slower-rooting plants.
Water propagation also gives you flexibility. You can keep the cuttings in water indefinitely if you like the look of trailing vines in glass containers, or you can transplant them into soil once the roots are a few inches long. Either way, you're starting with a method that's hard to mess up and easy to repeat as your collection grows.
What You'll Need to Get Started
Propagating pothos in water requires only a handful of everyday items, most of which you probably already have at home. The simplicity is part of what makes this method so beginner-friendly - no special equipment, rooting hormones, or soil mixes needed.
Start with a pair of clean scissors or pruning shears. Regular household scissors work perfectly fine as long as they're sharp and clean. Wipe the blades with rubbing alcohol or wash them with soap and hot water before you cut to minimize the risk of introducing bacteria to your cuttings.
You'll need a clear glass jar or cup to hold your cuttings. Transparency is helpful because it lets you watch the roots develop and monitor the water level without disturbing the plant. A recycled pasta sauce jar, drinking glass, or even a small vase will do the job. The container should be tall enough to support the cutting upright and wide enough that leaves won't be submerged.
Fill your jar with room-temperature tap water. If your municipal water is heavily chlorinated, let it sit out uncovered overnight so the chlorine can evaporate. This step isn't strictly necessary for pothos, which tend to be quite tolerant, but it's a gentle precaution that can improve rooting success. Avoid distilled water - tap water contains trace minerals that actually support root development.
Finally, you need a healthy pothos plant to take cuttings from. Look for a vine with vibrant green leaves and visible nodes - the small brown bumps along the stem where roots and leaves emerge. The parent plant doesn't need to be large; even a small pothos with a few trailing vines will provide plenty of cutting material.
That's the complete list. No grow lights, no fertilizer, no fancy containers. This straightforward supply list keeps the process accessible and low-pressure, which is exactly what beginners need to build confidence.
Step 1: Choose the Right Stem to Cut
The first step in propagating pothos is selecting a healthy stem with the right structure. Look for a stem that has at least two nodes and a few leaves attached. A node is the small bump or joint on the stem where leaves grow out and where roots will eventually emerge when placed in water. These nodes are critical - without them, your cutting won't develop roots.
Run your fingers along the vine and you'll feel these raised bumps, usually brown or tan in color, appearing just below where each leaf attaches to the stem. The node is the growing point of the plant, so it contains the cells needed to produce new roots. Choose a section of vine that looks vibrant, with green, unblemished leaves and firm stems. Avoid any stems that are yellowing, mushy, or show signs of damage.
When you're ready to cut, position your scissors or pruning shears just below a node - ideally a quarter-inch beneath it. This ensures the node remains on your cutting, giving it the best chance to root. You can take a cutting with two, three, or even more nodes if the vine is long enough, but two nodes is the minimum for reliable propagation. The leaves above the nodes will continue photosynthesizing and supporting the cutting while roots develop below.
Don't worry if you're new to this - pothos is forgiving. As long as you include at least one node on your cutting, you're on the right track. Selecting the right stem sets the foundation for successful propagation, so take a moment to examine your plant and choose a strong, node-rich section before making your cut.
Step 2: Make a Clean Cut
Once you've chosen a healthy stem, it's time to make the cut. Use clean, sharp scissors or pruning shears to cut the stem at a 45-degree angle, about a quarter inch below a node. The node is the small brown bump where leaves and roots naturally emerge, so positioning your cut just beneath it ensures the cutting has the best chance to develop roots.
A clean cut matters because ragged or crushed stems create entry points for bacteria and fungi that can cause rot before roots ever form. Wipe your scissors with rubbing alcohol or wash them with soap and hot water before you begin. If you're taking multiple cuttings, clean the blades between cuts to avoid transferring any potential issues from one stem to another.
The angled cut increases the surface area exposed to water, which helps the cutting absorb moisture and encourages faster root development. A straight cut works, but an angled one gives you a slight advantage, especially if you're new to propagation and want to stack the odds in your favor.
Make your cut in one smooth motion rather than sawing back and forth. A clean slice minimizes damage to the plant tissue and helps the cutting start strong. After cutting, you're ready to move on to preparing the cutting for water.
Step 3: Remove Lower Leaves
Once you've made your cuttings, check each one and remove any leaves that would sit below the water line when placed in a jar. Submerged leaves will rot quickly, which can cloud the water and introduce bacteria that may prevent roots from forming.
Gently pinch or pull off the lower leaves where they meet the stem, or use your scissors to snip them cleanly. You don't need to remove the leaf nodes - those bumps are exactly where new roots will emerge - just the leaf blades themselves.
Leave two to three healthy leaves at the top of each cutting. These will continue photosynthesis while the cutting focuses energy on root development. If your cutting is long and has many leaves, it's better to err on the side of removing more rather than risking decay.
Check that the cut end and at least one or two nodes are exposed and will be underwater, while all remaining leaves sit comfortably above the rim. This balance ensures the cutting has enough surface area for root growth without the risk of rotting foliage.
Step 4: Place the Cutting in Water
Once your cutting is ready, fill a clean glass jar or container with water - room-temperature tap water works well if you let it sit out for 24 hours to allow chlorine to evaporate, or use filtered water if you prefer. Position the cutting so that at least one node is fully submerged beneath the water line; this is where the roots will emerge. Make sure the leaves stay above the water to prevent rot.
Choose a spot with bright, indirect light, such as a few feet back from a sunny window or on a shelf that receives consistent ambient light throughout the day. Avoid placing the jar in direct sunlight, which can heat the water too quickly and encourage algae growth. The goal is stable warmth and plenty of light without harsh rays hitting the cutting or container.
Check that the node remains under water as evaporation occurs over the first few days. If the water level drops, simply top it off with fresh water to keep the node submerged. This simple setup gives your pothos cutting everything it needs to begin developing roots in the days ahead.
Step 5: Change the Water Regularly
Once your pothos cuttings are sitting in water, it's important to refresh the water every 3 to 5 days. This simple habit prevents algae growth, bacterial buildup, and stagnation that can slow or stop root development.
Fresh water should look clear and clean, with no visible particles or film. If the water appears cloudy, has a greenish tint, or smells off, change it immediately. Cloudiness usually signals bacteria or algae, both of which can interfere with healthy root formation.
When changing the water, gently lift the cutting out of the jar and pour out the old water completely. Rinse the jar with warm water to remove any residue or slime that may have formed on the sides or bottom. Refill with fresh room-temperature water and place the cutting back in, making sure the nodes remain submerged while the leaves stay above the waterline.
If you notice the water level dropping between changes due to evaporation, top it off with fresh water rather than waiting for the next full change. Keeping the nodes consistently submerged ensures they stay in contact with moisture, which is essential for root development.
This routine takes less than a minute but makes a significant difference in how quickly and reliably your pothos cuttings root. Clean water provides the oxygen and stability new roots need to grow strong and healthy.
Step 6: Wait for Roots to Develop
Once your cuttings are in water, the waiting begins. Most pothos cuttings will start showing roots within one to three weeks, though the exact timing depends on temperature, light, and the health of your cutting. Be patient - root development is a natural process that can't be rushed.
Healthy roots emerge from the nodes as small, white bumps that gradually lengthen into fine, branching strands. They should appear bright white or cream-colored and slightly translucent. As they grow longer - typically reaching one to two inches - they'll begin to branch out, creating a network that will eventually support the plant in soil or continue thriving in water.
If your cuttings take longer than three weeks, don't worry. Cooler room temperatures, lower light levels, or older stem tissue can all slow root formation. As long as the stems remain firm and green and the water stays clear, your cuttings are likely still viable. Just continue changing the water regularly and keep the jar in a spot with bright, indirect light.
Avoid the temptation to pull the cutting out to check for roots too often. Disturbing the node can delay development. Instead, watch through the glass - once you see roots that are at least an inch long with visible branching, your cutting is ready for the next step.
Step 7: Transplant to Soil (Optional)
Once your pothos roots reach about 2 to 3 inches long, you have a choice: transplant the cutting into soil or leave it growing in water. Pothos can live indefinitely in water with regular changes and occasional diluted fertilizer, so if you enjoy the look of water-rooted plants, there's no need to move them.
If you do decide to transplant, choose a small pot with drainage holes and fill it with a well-draining potting mix. Gently place the cutting into the soil, making sure the roots are covered but the lowest leaves sit above the soil line. Water thoroughly right after planting to settle the soil around the roots.
For the first week after transplanting, keep the soil consistently moist - not soggy - to help the roots adjust from water to soil. The plant may look a little droopy at first, which is normal as it adapts. After that initial week, you can shift to a regular watering routine, letting the top inch or two of soil dry out between waterings. The transition is usually smooth, and most cuttings establish quickly in their new pot.
What to Do After Your First Success
Once your first pothos cutting has rooted successfully, you've unlocked a skill that works for dozens of other houseplants. The same water propagation method applies to many beginner-friendly varieties, including heartleaf philodendron, tradescantia, and even some succulents with the right technique.
Consider starting a small propagation station on a sunny windowsill. Use a mix of jars or clear containers to root multiple cuttings at once - this lets you watch different growth rates and experiment with node placement. Label each jar with the cutting date if you want to track how long rooting takes under different conditions.
Sharing rooted cuttings with friends is one of the most rewarding next steps. Pothos cuttings make thoughtful, low-cost gifts, and you'll help others discover how easy indoor propagation can be. Just wait until roots reach two to three inches before passing them along, so the recipient starts with a stable plant.
If you're ready to expand your skills, try transitioning a rooted cutting to soil. Fill a small pot with well-draining potting mix, create a shallow hole, and nestle the roots gently inside. Water lightly and keep the soil consistently moist for the first week while the plant adjusts. Expect some minor leaf droop during the transition - this is normal as the roots adapt to pulling moisture from soil instead of water.
You can also experiment with rooting gel or powder on your next batch of cuttings. These products contain hormones that encourage faster root development, though pothos usually roots reliably without them. If you try one, dip the cut end briefly before placing it in water - you may notice roots emerging a few days earlier.
For variety, propagate from different parts of the same pothos vine. Cuttings taken from older, woodier sections sometimes root more slowly but produce sturdier plants. Cuttings from newer, greener growth tend to root faster and branch more readily. Observing these differences will deepen your understanding of how the plant grows.
As your confidence builds, consider trying variegated pothos varieties like 'Marble Queen' or 'N'Joy.' These follow the same propagation steps but grow more slowly and need brighter indirect light to maintain their patterns. Starting with your familiar golden pothos technique makes the transition seamless.
Keep a simple log of what works in your space - window direction, jar size, water change frequency - so you can repeat your successes and troubleshoot any future cuttings that stall. Propagation becomes easier and faster each time you do it, and soon you'll have a thriving collection grown entirely from a single plant.
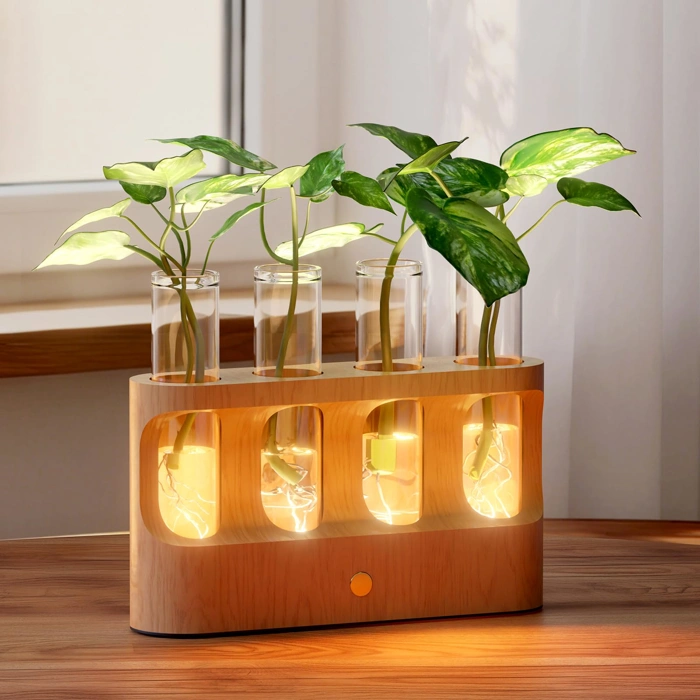
Giunn Rechargeable Plant Propagation Station with Dimmable LED Light & 4 Glass Test Tubes
The Giunn Rechargeable Plant Propagation Station pairs a dimmable LED grow light with four glass test tubes, making it a practical choice for rooting pothos cuttings in spaces that don't get much natural light. The integrated light sits on a wooden stand and runs on a rechargeable battery, so you don't need an outlet nearby - useful for desks, shelves, or windowless corners.
Each of the four glass tubes holds one cutting, letting you propagate multiple pothos stems at once or experiment with different node placements. The tubes sit in wooden holders and are easy to remove for water changes. The dimmable LED gives you control over light intensity, which is helpful during shorter winter days or in rooms with limited sun exposure.
The compact footprint makes this station suitable for small apartments or tight counter space. The rechargeable design means you can move it around without managing cords, though you'll need to recharge periodically depending on how long you run the light each day.
At $25.99, the station offers a straightforward way to combine light supplementation and water propagation in one unit. It's rated 4.8 out of 5, and current availability shows it in stock. If you're rooting cuttings in a dim area or want a tidy setup that doesn't sprawl across your workspace, this design keeps everything contained.
Check current price and fit to see if the rechargeable LED and four-tube capacity match your propagation routine and space constraints.
- ✅ Rechargeable LED eliminates need for nearby outlet
- ✅ Dimmable light adjusts to seasonal or room conditions
- ✅ Four glass tubes allow multiple cuttings at once
- ✅ Compact wooden stand fits small desks and shelves
- ⚠️ Requires periodic recharging depending on daily light duration
- ⚠️ Four-tube capacity may be limiting for larger propagation projects
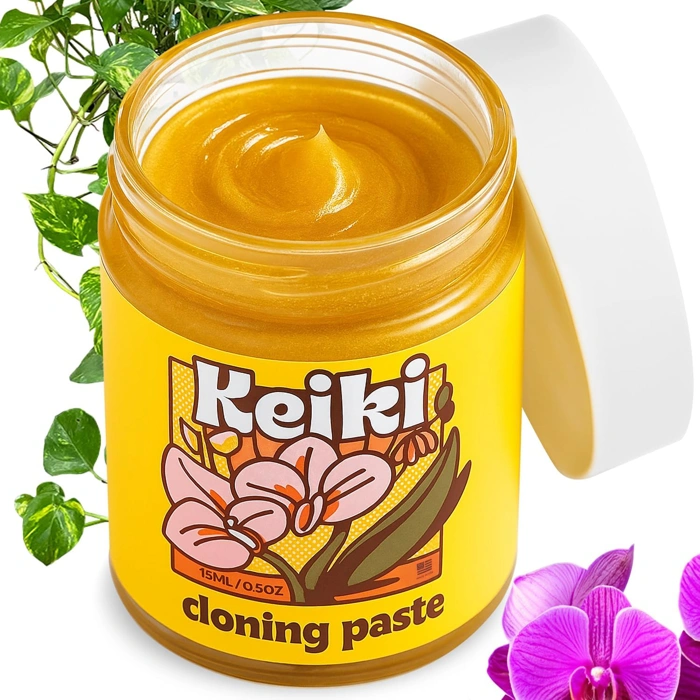
Keiki Rapid Start Plant Cloning Paste Gel - 0.5oz
Keiki Rapid Start Plant Cloning Paste Gel is a rooting hormone option designed to speed up root development on cuttings. The 0.5-ounce tube is a concentrated gel that you apply directly to the cut stem before placing it in water. For beginners, this product is entirely optional - pothos cuttings root readily in plain water - but it can help if you're impatient or working with a cutting that seems slow to respond.
The gel delivers a small amount of rooting hormone exactly where the plant needs it, and the 0.5-ounce size goes a long way; you only need a small dab per cutting, so one tube can last through many propagation sessions. The tradeoff is cost: at $18.99, this product adds an expense that plain water doesn't require. If you're propagating a single pothos cutting or just getting started, water alone will work fine and you'll see roots in one to three weeks under good conditions. If you're propagating multiple cuttings, want faster results, or have had trouble with slow root development in the past, the gel can shorten the wait and may give you more consistent success.
Application is straightforward - dip or dab the cut end, then place the cutting in your jar of water as usual. The gel stays on the stem and doesn't cloud the water. Because pothos is already an easy plant to propagate, this product won't make or break your success, but it can make the process noticeably faster. Weigh the convenience of quicker roots against the cost and your own patience level.
- ✅ Small dab per cutting means 0.5oz lasts many uses
- ✅ Gel stays on stem and doesn't cloud water
- ✅ Can speed root development for impatient growers
- ✅ Straightforward application - dip and place in water
- ⚠️ $18.99 adds cost that plain water doesn't require
- ⚠️ Not essential for pothos, which roots easily on its own
- ⚠️ Benefit may be minimal for already fast-rooting cuttings
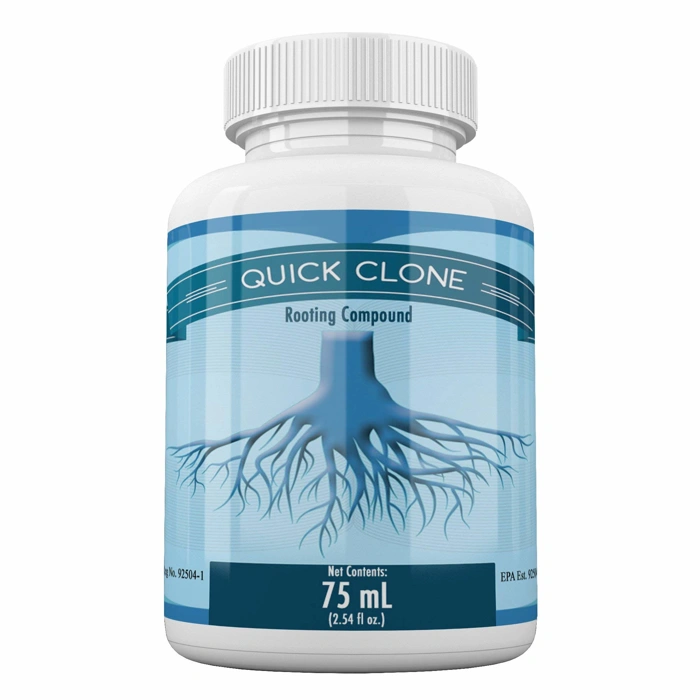
Quick Clone Gel for Faster, Stronger Rooting (75mL)
Quick Clone Gel offers a budget-friendly option for propagators working with multiple cuttings. At $15.97 for 75mL, this gel sits at a lower price point than many competing products while still providing rooting hormone support for water propagation.
The gel format coats stem ends evenly, creating a barrier that holds hormones in contact with the cut surface longer than powder formulas. For pothos cuttings, apply a thin layer to the bottom node before placing the stem in water. The gel will gradually dissolve, releasing rooting compounds as the cutting begins to develop roots.
With a 4.3/5 rating, users report reliable results across a range of houseplants. The 75mL bottle provides enough product for dozens of cuttings, making it practical for anyone propagating pothos regularly or experimenting with multiple jars at once. The gel consistency makes it easy to control application - you won't waste product or over-apply to delicate nodes.
This product works best when you're propagating in batches and want to speed up root development without investing in larger or more feature-rich formulas. It doesn't include kelp extract, vitamin additives, or other supplemental ingredients, so results depend primarily on the rooting hormone itself and your water quality.
For beginners starting with a handful of pothos cuttings, this gel delivers straightforward support at a price that makes sense for small-scale propagation.
- ✅ Budget-friendly at $15.97 for 75mL
- ✅ Gel format coats nodes evenly and stays in place
- ✅ Enough volume for dozens of cuttings
- ✅ Easy to control application without waste
- ⚠️ No supplemental kelp or vitamin additives
- ⚠️ Smaller bottle than some alternatives
- ⚠️ Results depend on water quality and basic hormone formula
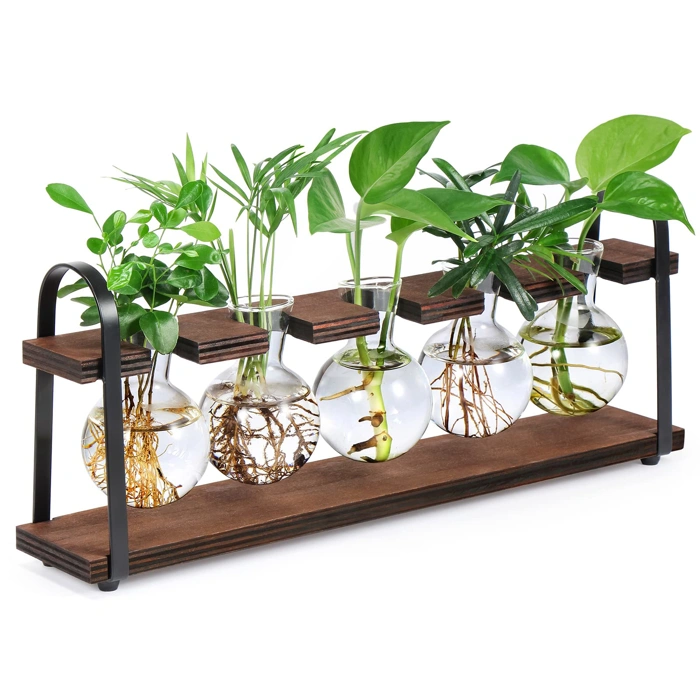
THYGIFTREE Plant Propagation Station with Wooden Stand & Glass Terrarium Bulb Vase
The THYGIFTREE Plant Propagation Station pairs a wooden stand with a bulb-shaped glass vase, turning your pothos cuttings into visible decor while they root. The design keeps the vase stable and upright on countertops or shelves, and the clear glass lets you watch root development without lifting the cutting.
This station suits beginners who want propagation to fit into their living space as an intentional display piece rather than a repurposed jar tucked in a corner. The wooden stand offers a finished look, and the bulb shape provides enough water volume for multiple cuttings or a single stem with room to grow. It's rated 4.6 out of 5, reflecting consistent quality and aesthetic appeal.
The tradeoff is cost and footprint: at $22.99, it's a purpose-built option compared to free recycled glass jars, and the stand requires dedicated surface space. If you're propagating several cuttings at once or prefer mobility, individual jars may offer more flexibility. But for a single statement piece that blends function and style, this station delivers both stability and visual interest.
The clear glass and open top make water changes simple, and the stand helps reduce the chance of tipping if you place it near a bright window. It works well for beginners who want their propagation process to feel deliberate and attractive from day one.
- ✅ Wooden stand keeps vase stable and upright
- ✅ Bulb-shaped glass allows easy root observation
- ✅ Finished look suits visible countertop or shelf placement
- ✅ Clear glass simplifies water changes
- ⚠️ Higher cost than repurposed jars
- ⚠️ Stand requires dedicated surface space
- ⚠️ Single vase limits number of simultaneous cuttings
Common Mistakes to Avoid
- Using dirty scissors or jars - bacteria and fungi from unclean tools can infect the cut stem and cause rot before roots even form
- Submerging leaves underwater - any foliage below the waterline will decay, cloud the water, and introduce harmful bacteria
- Placing cuttings in direct sunlight - intense light scorches tender leaves and heats the water, stressing the cutting and encouraging algae growth
- Forgetting to change the water - stagnant water becomes a breeding ground for bacteria and algae that choke out root development
- Cutting stems without nodes - roots only emerge from nodes, so a cutting without at least one node will never root no matter how long you wait
- Using very cold or hot water - temperature shock stresses the cutting and slows or stops root growth; room-temperature water is always safest